Getting Started
Getting Started with Github and RStudio Projects
Open Science is a movement to make scientific research (including publications, data, software) transparent and accessible so that knowledge is shared. Here we will provide steps to get started; in future sections we will provide additional details on specific tasks/projects
Embrace the Open Science Mindset! Learn more about this approach and why it matters at Openscapes.org and the Openscapes Approach Guide.
Add Software Tools
RStudio (v2022.07.2 build 576 or later)
Create a Github Login
Create a NEW Repository from a template:
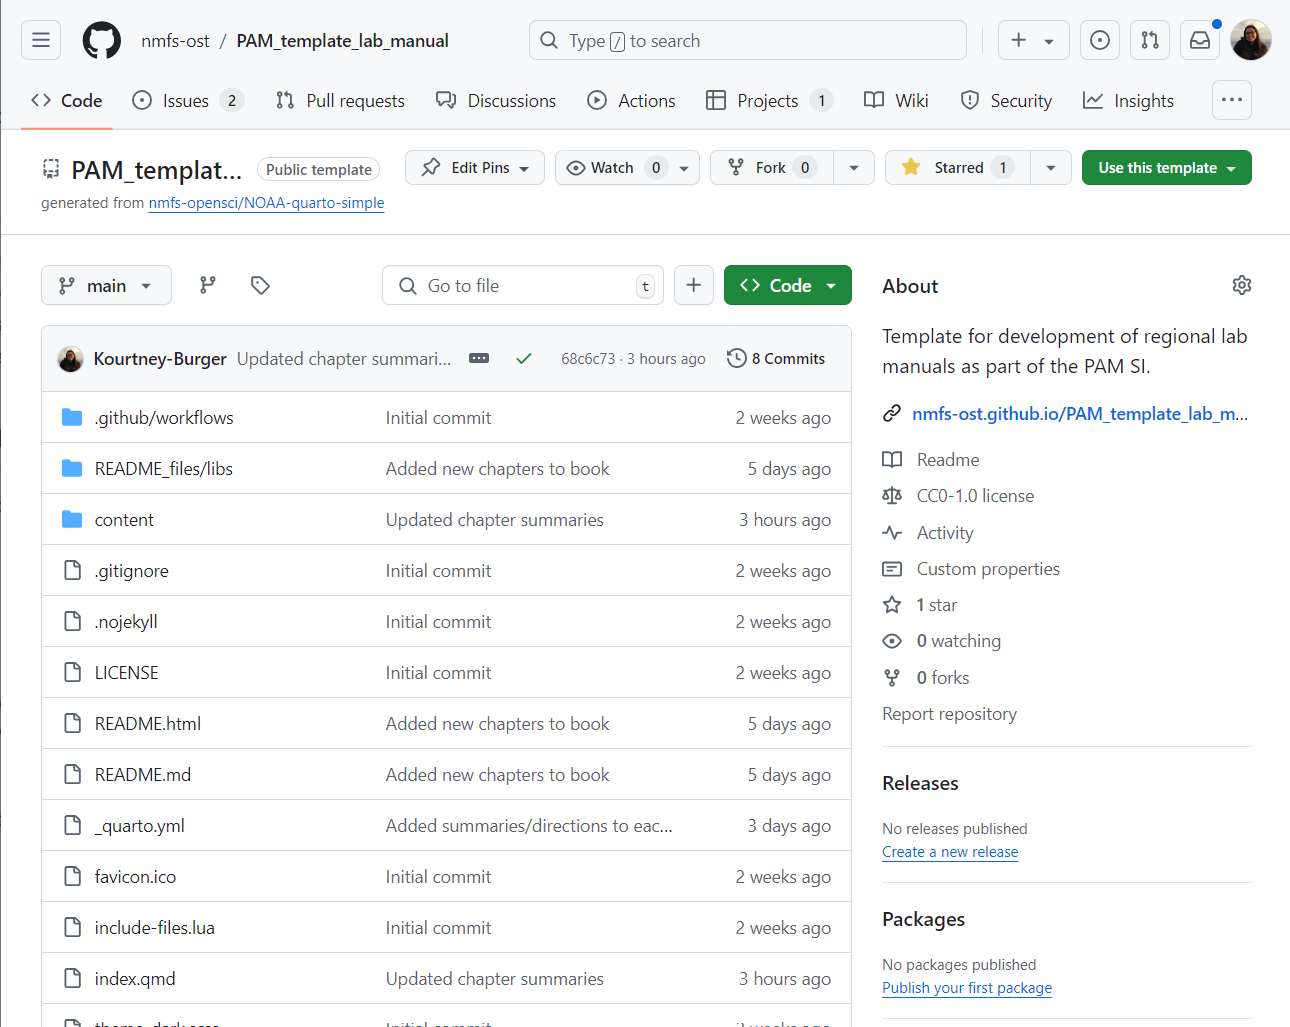
Go to the Github Repository for the PAM Lab Manual Template
Click on the ‘Use this template’ button in the top right, select ‘Create new repository’

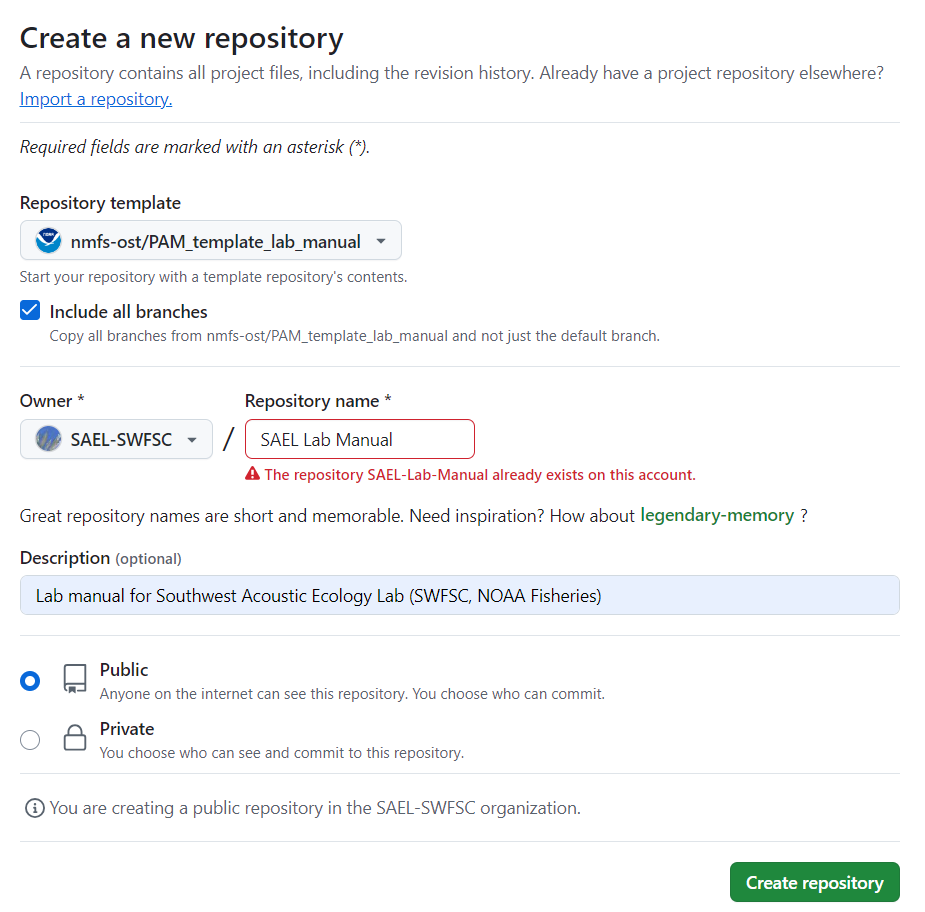
Edit repository settings
Select the ‘Include all branches’ option
Select your lab organization or yourself as the owner and set the repository name to ‘Lab name Lab Manual’
Make description “Lab manual for ‘insert lab name and FMC’”
Make the repo public

Click create repository
Turn on GitHub pages under Settings->Pages. You will set pages to be made from the gh-pages branch and root directory

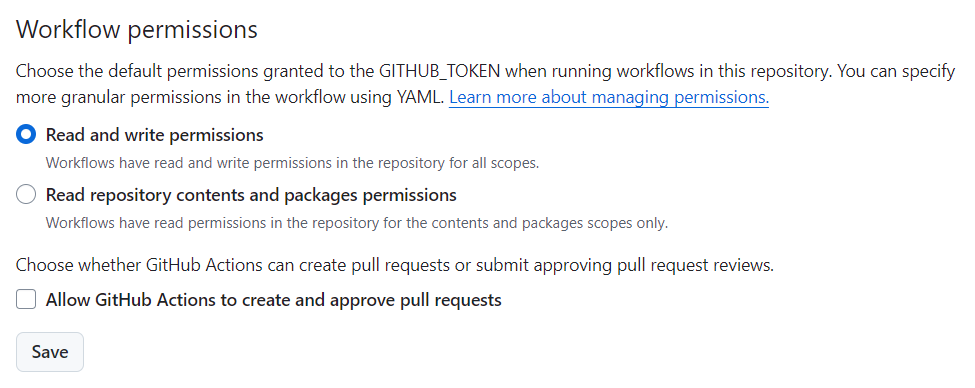
Update ‘Actions’ settings
Under Settings -> Actions -> General -> Actions permissions select ‘Allow all actions and reusable workflows’. Select save

Under Settings -> Actions -> General -> Workflow permissions select ‘Read and write permissions’
 Note: Both of these settings may already be selected but you have to click save for both
Return to the main page of the repo to edit your website
Click on ‘Code’ in the top left
Click on the settings button next to the ‘About’ section on the right side of the repository
Select ‘Use your GitHub Pages website’. This should autopopulate the website
Select ‘Save Changes’

Clone Repository to Local Computer
Clone your Test Repository to your local computer using Github Desktop:
File -> Clone Repository -> URL
Copy URL of your chosen Repository on Github, then save to your Documents -> Github folder using the defaults. See Introduction to Git/Github tutorial for more help.
Create a New Rstudio Project
Create a new project in RStudio.
Open RStudio. In the upper right hand corner of RStudio, select ‘New Project’ in the drop-down menu to add a new R Project from an Existing Project.
Browse to find the appropriate folder in Documents-> Github.
Modify the README.md file.
In the lower right section of RStudio, select ‘Files’ and you will see the README.md file, which appears on the home page on your Github repository site.
Open this file and edit using either Source Code or Visual Editor
Add the title of your repository (using # Title in Source Code or Heading 1 in Visual Editor)
Add text below the title describing the contents/purpose of this repository
Add the following Disclaimer and License (### Disclaimer if using Source Code):
Disclaimer
This repository is a scientific product and is not official communication of the National Oceanic and Atmospheric Administration, or the United States Department of Commerce. All NOAA GitHub project content is provided on an ‘as is’ basis and the user assumes responsibility for its use. Any claims against the Department of Commerce or Department of Commerce bureaus stemming from the use of this GitHub project will be governed by all applicable Federal law. Any reference to specific commercial products, processes, or services by service mark, trademark, manufacturer, or otherwise, does not constitute or imply their endorsement, recommendation or favoring by the Department of Commerce. The Department of Commerce seal and logo, or the seal and logo of a DOC bureau, shall not be used in any manner to imply endorsement of any commercial product or activity by DOC or the United States Government.
License
This content was created by U.S. Government employees as part of their official duties. This content is not subject to copyright in the United States (17 U.S.C. §105) and is in the public domain within the United States of America. Additionally, copyright is waived worldwide through the CC0 1.0 Universal public domain dedication.
Save! This Readme will show up at the bottom of our Github Repository
Modify the index.qmd file (home page)
Open the index.qmd file
Modify using Source Editor to add a title and introductory text for the home page (for website). Title will need to be written in this format:
title: “This is my title”
Commit & Push to Github
Commit & Push to Github.
Save project in RStudio
Open your project in Github Desktop; Github desktop will identify the changes you made (refresh if necessary).
At the bottom left, describe the modifications you made to the document, and then select ‘commit’.
Once the commit goes through– select ‘Push to Origin’ at the top. This will push changes to your Github repository.
Check the updates on Github
Open your Github repository
Go to Actions Tab- is it rendering? did it go through (green) or fail (red)?
View the updated Github Repo ReadMe
View the updated Website Homepage
Adopt this process as your daily habit of working on your projects locally and saving your data to Github.
Additional Resources
Introduction to Git/Github Tutorial (Eli Holmes, NMFS)
Git for Humans (Alice Bartlett)
Happy Git with R (Jenny Bryan)
